We’ve reached the last post of our Kaltura series! Here, we’ll be covering two final aspects of Kaltura – accessing video analytics and creating video quizzes.
Finding Video Analytics
Viewer analytics can be accessed from My Media both inside and outside of Canvas (through video.cedarville.edu).
- Select any video within My Media
- Select the bar graph icon
- Types of analytics displayed/terminology:
- Player Impressions – The number of times that the video interface is viewed via the page it is within.
- Plays – The number of times users clicked play to watch the video.
- Number of unique viewers – The number of authenticated viewers. All anonymous viewers will be counted as a single viewer.
- Number of minutes viewed – The total duration of video watched by viewers.
- In order to see specific student info, select “View Engagement per User”
Creating a video quiz
Creating a video quiz can be done in My Media either inside and outside of Canvas (through video.cedarville.edu). You can create video quizzes with media you upload, media that is shared with you as a collaborator, YouTube videos, and audio recordings.
- Add New > Video Quiz.
- Find your video, click “Select” (or upload video if it’s not in your library yet)
- Details/Scores/Experience – editable, but defaults are ok too. Here are some pointers to keep in mind.
- Details – It might be worth changing the name and welcome message instead of using the default.
- Scores – Multiple attempts, along with several options related to the attempts, are hidden here.
- Experiences – You can allow skipping questions or allow skimming through the video here.

- Adding questions
- Move cue point to desired question spot
- Add a Question: question types are self-explanatory. The reflection point is not necessarily a “question.” Think of it more as a chance for you to pause the video and refocus or emphasize something in the video itself that could be used for later discussion or reflection.
- Click “Save”

- Here are some tips
- For Multiple Choice questions, shuffle answers with the icon in the top left or move the options around with three dots.
- If you would like to add a hint or rationale for an answer, click the lightbulb in the top right.
- Do not put the quiz questions too close together on the timeline. It could cause problems loading the interface. Kaltura recommends at least half of a second between questions.
- To increase engagement with your video, consider putting a question at the end.
- To move a question on the timeline, click the icon, then click and drag, then “Save.”

After you are satisfied with your quiz, click “Done.” You can then preview it and embed it in Canvas. You can embed the video as a Canvas assignment by utilizing the External Tool submission type and selecting Kaltura Video Quiz. Note: Reflection and Open questions are not gradable by Canvas. Answers to open questions are found under Analytics in Media Space.
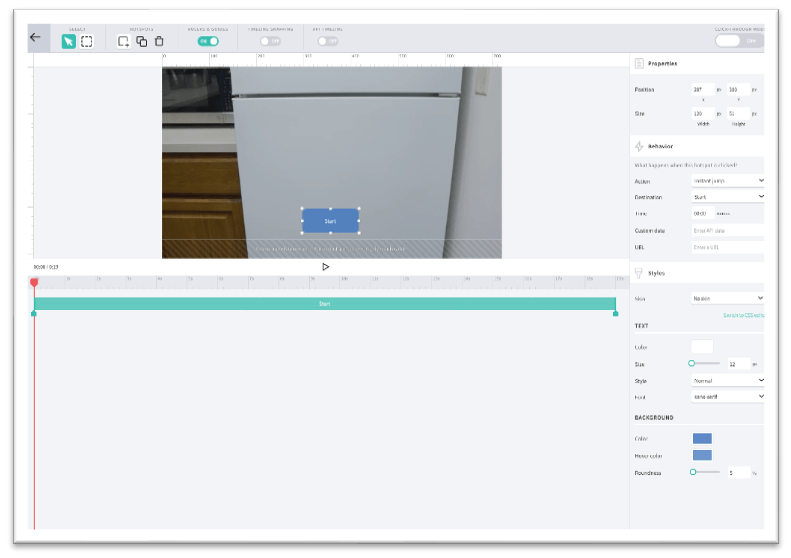
Creating an interactive video
Interactive Videos can be created in Canvas or in Media Space (video.cedarville.edu). We recommend doing it in Media Space because you will have more room to “move around.”
Note: Kaltura has provided a list of supported browsers and devices. It would be a good idea to make sure your intended participants can easily access your interactive video.
- Add New > Interactive Video
- Add Media – You can add media that you own or media you have permission to publish. Click “Create”

- Interactive Video workspace
- Show/Add Media – click video and drag to create a node or click and drag “Empty node” onto the workspace
- Draw connections to videos by hovering over the right side of a node to make an arrow appear. Click and drag to connect to another video

- Customize buttons and timeline
- You can customize when a button appears in a video by clicking and dragging the arrows at the beginning and end of the button on the timeline (under the video).
- You can customize the behavior and the look and feel of the button in the sidebar to the right of the video.
- “At end of video” is an important function. If you are having viewers choose the next step, choose freeze. If you have another video you want to naturally come next (without a choice), choose “Default path” and choose the next destination from the dropdown menu. Default paths show up as dashed lines in the workspace.
To preview, click “Save Project.”
And with this, our Kaltura series comes to an end. We will be adding posts in the future to highlight other features or provide more insight on best practices. In the meantime, leave us a comment below or send us an email at ctl@cedarville.edu if you have questions. We’d love to help you out.
Lauren Eissler contributed to this post.
Want to never miss a post? Subscribe here!
- How I Used ChatGPT to Reimagine “Introduction to Literature” - October 30, 2025
- 2024 AECT Reflection – Jargon, Memorization, and Understanding - November 7, 2024
- 2024 AECT Reflection: Student Usage of GAI, Part 2 - November 5, 2024